Slide 1 of 17
 Nanoscale · Module 05
Electron Microscopy and Image Basics
Teaching Deck
Human cortex · H01
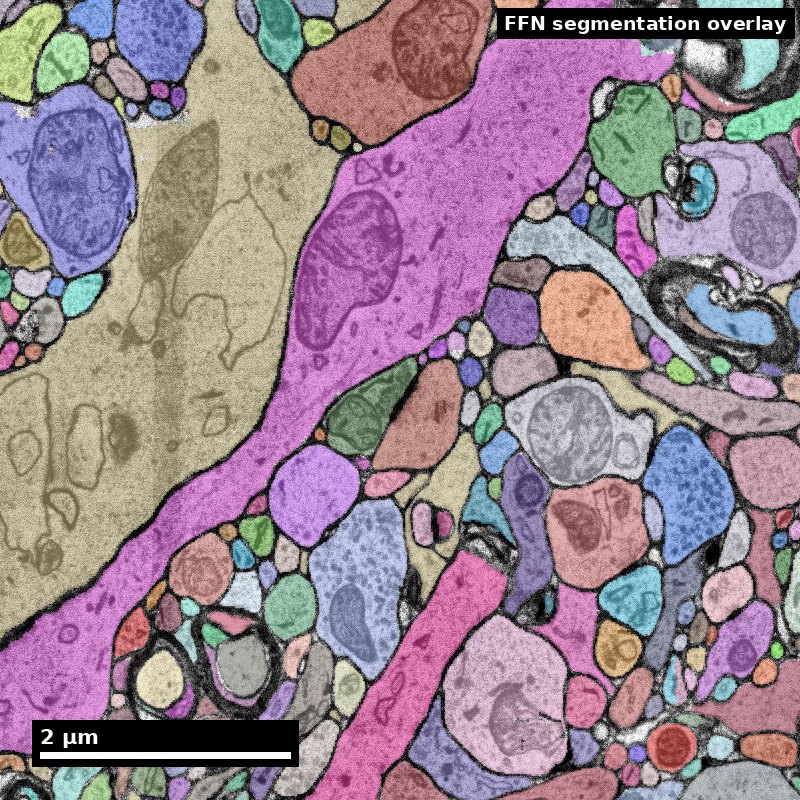
Object segmentation over electron microscopy
H01 release · Lichtman Lab / Harvard & Connectomics at Google · CC BY 4.0
Shapson-Coe et al. (2024) · doi:10.1126/science.adk4858
Slide 2 of 17
Learning Objectives
- Describe core EM acquisition concepts relevant to connectomics
- Identify common image artifacts and likely downstream impact
- Interpret image quality for segmentation readiness
- Document uncertainty and QA decisions
Slide 3 of 17
Capability Target
Evaluate EM image patches for artifact risk and issue a justified pass/rework recommendation.
Slide 4 of 17
Concept Focus
EM image quality is not merely an aesthetic concern — it is the single most consequential variable that determines segmentation accuracy and, by extension, the validity of every connectomic claim built on that segmentation. A 20% reduction in membrane contrast can double the split error rate in automated reconstruction, because the segmentation model loses the luminance gradient it relies on to delineate adjacent neurites. Every downstream analysis result — synapse counts, path lengths, circuit motifs — inherits the quality ceiling set at acquisition. This means that the person evaluating image quality is making a decision that propagates through the entire pipeline. Treating QA as a clerical step rather than a scientific judgment is one of the most common and costly mistakes in connectomics projects.
Slide 5 of 17
Core Workflow
- Inspect image quality and artifact signatures.
- Classify severity and likely impact on segmentation.
- Decide pass/flag/rework with documented rationale.
- Log findings in a structured QA record for reproducibility.
Slide 6 of 17
Run of Show (60 min)
-
- 00:00-08:00 — EM basics refresher
-
- 08:00-20:00 — Artifact recognition walkthrough
-
- 20:00-34:00 — Learner triage round
-
- 34:00-46:00 — QA threshold debate
Figure description and teaching notes
Pre-class preparation (5-10 min async)
Before the session, students should:
Review the EM principles content library entry, focusing on the section on image formation and contrast mechanisms.
Preview the three sample image patches posted to the course portal: one clean image, one with moderate knife chatter, and one with a tissue fold. For each, note initial impressions of quality.
Materials needed
Projected EM image gallery (8-10 patches at varying quality levels)
Printed or digital QA decision worksheet (one per student)
Timer visible to the class
Artifact reference card (single page, double-sided)
Minute-by-minute schedule
1. 00:00-08:00 — EM basics refresher
*Instructor cue*: "We are going to start with a fast review. I will show four images — tell me which modality produced each one and why you think so."
Show four images (ssTEM, SBEM, FIB-SEM, and one intentionally ambiguous). Cold-call students for modality identification and reasoning.
Briefly review how contrast arises from heavy metal staining and electron scattering. Emphasize that membrane visibility depends on staining protocol, not microscope settings alone.
2. 08:00-20:00 — Artifact recognition walkthrough
*Instructor cue*: "Now I am going to show you the five artifacts that cause 90% of segmentation failures. For each one, I want you to predict: will this cause a merge error, a split error, or a topology break?"
Walk through knife chatter, charging, folds, missing sections, and staining gradients with annotated example images.
For each artifact, show the segmentation output on the same region so students can see the predicted error type realized in practice.
*Formative check*: After the third artifact, pause and ask students to classify the next one independently before revealing the answer.
3. 20:00-34:00 — Learner triage round
*Instructor cue*: "You have 14 minutes. Work in pairs. Each pair receives six image patches. For each patch, fill in the QA worksheet: artifact type, severity (1-3), predicted segmentation impact, and your pass/flag/rework decision."
Circulate and listen for common misconceptions. Note which artifact types cause the most disagreement.
*Formative check*: At 30:00, ask one pair to share their most difficult call and explain their reasoning.
4. 34:00-46:00 — QA threshold debate
*Instructor cue*: "Pair A said this patch is a pass. Pair B said rework. Both of you, defend your position."
Facilitate structured debate on 2-3 patches where pairs disagreed. Push students to articulate the cost tradeoff: what is the cost of re-acquiring versus the cost of proofreading the resulting errors?
Introduce the concept of escalation levels (hard stop, flag and monitor, pass) and ask students to re-classify their six patches using this framework.
5. 46:00-56:00 — Decision logging practice
*Instructor cue*: "A QA decision that is not logged does not exist. You are now going to write a QA log entry for your hardest patch."
Students write a structured QA entry: image ID, artifact type, severity, decision, rationale, and any conditions (e.g., "pass if proofreading budget is allocated to rows 12-18").
Show an example of a well-written and a poorly-written QA entry for comparison.
6. 56:00-60:00 — Competency check
*Instructor cue*: "Final check. I am showing one new patch. You have two minutes to write your QA verdict on an index card. Include artifact type, severity, decision, and one sentence of rationale."
Collect index cards. Review after class to identify students who need follow-up.
Formative assessment checkpoints
08:00: Can students distinguish EM modalities from image appearance?
20:00: Can students predict segmentation error type from artifact type?
34:00: Can students apply severity ratings consistently across patches?
46:00: Can students articulate cost tradeoffs in QA decisions?
56:00: Can students write a structured QA log entry?
Post-class assignment
Select three EM image patches from the course dataset that were not covered in class. For each patch, write a complete QA log entry (artifact type, severity, predicted segmentation impact, pass/flag/rework decision, rationale). Submit as a single document. At least one patch should involve an artifact type the student finds personally difficult to assess — include a brief reflection on what makes it challenging.
Slide 7 of 17
Run of Show (60 min) (continued)
-
- 46:00-56:00 — Decision logging practice
-
- 56:00-60:00 — Competency check
Slide 8 of 17
Misconceptions to Watch
- Misconception guardrail: you can proofread your way out of a bad image.
- Misconception guardrail: a noisy image is worse for segmentation than a clean image with faint membranes.
- Misconception guardrail: artifact severity can be judged from a count, when the spatial distribution matters more.
- Misconception guardrail: quality assessment is a clerical checkpoint rather than a scientific judgment that propagates through every downstream claim.
Slide 9 of 17
Check the image before trusting a label
Inspect the underlying electron microscopy, not just a colorful overlay.
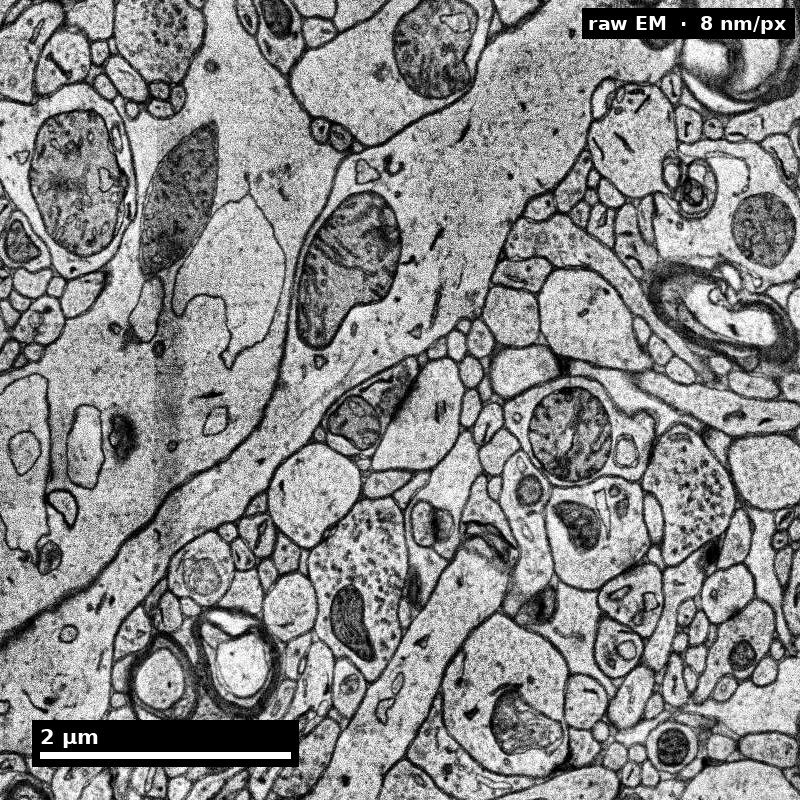
Discuss: What would make you inspect neighboring sections?
H01 release, Lichtman Lab / Harvard and Connectomics at Google; Shapson-Coe et al. (2024), doi:10.1126/science.adk4858; CC BY 4.0.
Figure description and teaching notes
Visual description and discussion guidance:
The field contains adjacent membrane profiles and organelles. This is an inspection example, not a deliberately corrupted image with a hidden answer key. Review continuity, contrast, section context and scale before deciding whether a region needs to be flagged.
Slide 10 of 17
A flag should lead to a specific check
An unusual appearance is not a confirmed artifact.
- 1
Observe
Describe the discontinuity or ambiguity.
- 2
Compare
Inspect neighbors and acquisition context.
- 3
Decide
Proceed, request review, or rework; state why.
Discuss: What evidence would change your decision?
Illustrative teaching scenario; see this module’s lesson and worked example.
Figure description and teaching notes
Visual description and discussion guidance:
The workflow separates observation, additional evidence and action. The appropriate action depends on the scientific endpoint and available evidence; unusual appearance alone is not an automatic rejection rule.
Slide 11 of 17
Studio Activity
Scenario: Your team has received pilot images from a new ssTEM acquisition of mouse visual cortex. The imaging facility reports that initial sections looked good, but they encountered intermittent knife chatter starting around section 200 and a possible staining gradient in the lateral third of the field of view. Before the facility commits to imaging the remaining 800 sections, your team must evaluate the pilot data and deliver a go/no-go recommendation with conditions.
Slide 12 of 17
Activity Output Checklist
- Evidence-linked artifact submitted.
- At least one limitation or uncertainty stated.
- Revision point captured from feedback.
Slide 13 of 17
Assessment Rubric
- Minimum (pass): Accurate identification of major artifacts across all patches, correct mapping to segmentation error type, and a defensible pass/flag/rework decision for each patch.
- Strong (merit): Clear articulation of cost tradeoffs, consistent severity thresholds across patches, spatially aware analysis, and a well-structured recommendation memo with specific conditions.
- Failure: Artifact labels assigned without reference to downstream segmentation implications, or QA decisions made without documented rationale.
Slide 14 of 17
Exit Ticket
Pick one artifact and explain how it could create a merge or split error later. Then estimate: if this artifact appears on 5% of sections, how many additional proofreading hours would it add to a 1000-section volume?
Slide 15 of 17
References (Instructor)
- Use module references listed on the module page.
Slide 16 of 17
Teaching Materials
- Module page: /modules/module05/
- Session kit: /teaching/sessions/module05/
- Worksheet: /assets/worksheets/module05/module05-activity.md
Slide 17 of 17
Read, review, or teach
The reading version includes figure descriptions and discussion guidance.
Nanoscale text: CC BY 4.0. Scientific figures retain their individual credits.